Saturday 25 February 2012

u-handbag

Hello. I've spent half of the day in the garden today, it still looks like a bombs hit it and Mr B has been moving sheds again. I'm sure that the sheds in our garden, of which we have three, no, make that four (quick mental count up) have been on a constant clockwise rotation in our garden, which given the size of it, is no mean feet. But it reminds me how great spring and summer are, when you can have the back doors open, the girls running in an out, no kids TV on. Happy days. It'll probably snow next week.

So those of you who have visited my blog before know that I wax lyrical on a regular basis about Urban Threads, their fantastic machine embroidery designs and truly inspirational tutorials.But I probably wouldn't really have got going on this whole bag making adventure with out u-handbag.com and Lisa Lam's brilliant book The Bag Making Bible.
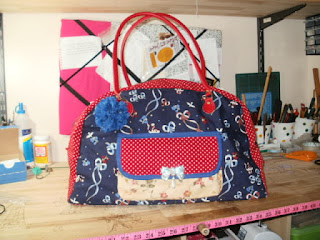
This is my Manga bag, quite possibly my favourite bag out of all I've made over the past year-and I've made a lot- and probably the most commented about, and its a version of one of the bags in the book. Whenever I want to know how to make a certain type of pocket, insert a fastening, anything technical, this is the book I automatically reach for. The patterns (printed full size on a pullout at the back) are easy to follow and well illustrated and with all of the information she provides you with, you can easily change and slightly adapt the patterns. For example, my manga bag should have had piping around the edge, but I didn't think my croaky old machine could cope with that without going into complete melt down and taking me with it; so I just left it out.
I was recently asked to make a bag big enough to carry a camera, lenses, spare batteries alongside your everyday chattels; to look a little something like this:

I searched high and low to find a suitable pattern, but The bag Making Bible was the only one of my books that had something anywhere near big enough, and following her instructions on making a boxed pocket, I was able to tweak the pattern to suit, et voila:
And via her website, she also gifted me with a link (and uncanny timing), to Vanilla and lace which had a tutorial on a camera bag insert:

Job done.
The website is not only packed with gorgeous bag making bits- yes I know, I'm sad, I get excited about things like that!- but also advice about starting up a business and some great free tutorials. This is my version of the kiss lock purse:

which was really simple to make and looks beautiful. The Laundry Day purse, which I've mentioned here before, is the pattern I always return to when I'm making a purse frame purse.
I think it was quite probably seeing the Reversible Bucket Bag in a magazine that kick started my interest in  making bags, and if you're looking for that one book on bag making that you'll use time and time again, then this is the one.
I have a week of decorating looming ahead of me. Preferably without the help of a keen three year old. That is headache inducing stress!
Take care. xx

Monday 13 February 2012

Steampunk'd

Steampunk is something that's caught my imagination a bit. Occasionally something creeps up on you and inspires you. For those who don't know- and I didn't until a couple of months ago, steam punk is, in basic terms, Victorian science fiction. Think Jules Verne, Philip Pullman, clockwork, steam power.

So, time for a quick book review.
Steampunk Emporium by Jema Emily Ladybird Hewitt. It was on my Amazon wish list for ages and I ummed and arred about it. I had bought another Steam punk jewellery book and found it a little bewildering and really not what I was expecting, plus there were a load of parts needed that were a little tricky/expensive to find. But this one is a gem! From bracelets to hatpins, necklaces to pocket watches, its a fantastic source book for inspiration. Just a tiny bit of digging on the Internet and I easily found the parts I needed for a couple of the projects. Each project is accompanied with a little story for introduction if you like that kind of thing- which I do.
So far I have made my version of the Brass Wings Necklace:

And the 1st Lunar Regiment Dog Tags:
Then armed with a bag of watch parts and some Araldite I went on to make another necklace:


Now jewellery isn't really my thing, I just like dabbling from time to time, so there were some things in the book- like a rather expensive two part resin which I didn't want to invest in, but all of the designs can be adapted to work around this. The instructions are clear and accompanied by plenty of photos. I love this book and can't wait to get started on another piece.

Bags, however are my thing, and following in the Steam punk theme, with a messenger bag pattern from Making magazine and an embroidery design from my favourite website; an evenings work came up with this:


 complete with pocket watch! In the past I've struggled to come up with  more masculine bags for my craft fairs, but I think a few of these might go down okay. Tick Tock....

Take care. xx

Monday 6 February 2012

Tattoo you

No I haven't, but that kind of seems to be the theme of the day. All will become clear...
Great what you can do with a small tester pot of paint. I decided that the cream walls of my little den of sewing and all things creative just weren't inspiring- or warming or lets face it, interesting. And my use of flowerpots for tool holders, well the flower pots could be put to better use, as could some tin cans. So a small pot of paint, some fancy paper and a few tin cans later and this is what I ended up with.

Its just such a much nicer place to be. Plus, now Mr B has plugged the gap between the door and the window I could see daylight through, its a much warmer place to be, and lets face it in this weather at the moment that has to be the main priority!
In my vague attempt at a new years resolution- a little late in the day I grant you- I am intending to use up the big basket full of material I have accumulated over the last year. Buy less, use what I've already got. Which is where the tattoo-ey theme of the day has come from.
Use of piece of fabric part one. Pin board. With a bit of lace thrown in for good measure.
And something a little bit rock n'roll needs a skully pin cushion to go with it.

The other piece I teamed up with a piece of heatproof wadding and an old pair of jeans- yes another use for hubby's old jeans- to make a new pair of oven gloves. Mine are grubby, burnt and usually seen disappearing on the end of a small child so I can never find them. So time for a new pair.

I cut a couple of rectangles from the legs- about 75cm x 20cm and a piece of wadding the same, round the edges and sandwich it in between. I didn't have a long enough stretch of fabric to cut another rectangle that size so instead I cut a piece to cover the middle section then two pieces to make the mits which measure about 23cm x 20cm. The mit sections are two pieces of fabric sewn together along the straight edge right sides facing, then flip over and press the edge before sandwiching another piece of wadding in between them. Stack it all up- obviously one mit at each end, pin it and baste in place before edging it with bias tape. I like anything that looks quite nice, pink and girly from a distance but has a bit of an edge when you get close up. Rocking oven gloves!
So that's what I've been up to whilst enjoying the snow from a nice warm house. Now for a hot chocolate me thinks..
Take care. xx