Saturday, 27 August 2011

Feet up..

Ha ha. I have a purple kitchen. Not quite sure how I got that one past Mr B, then again, he hasn't got home to see the end result yet, so maybe I haven't quite got away with it yet. Then again, at the moment, he's more interested in knocking another wall down and as long as he doesn't have to raise a paintbrush, he's a happy man! 
So I'm now putting my feet up and catching up with X Factor. Every year I think that I won't watch it this time, that I won't let my entire run of Saturday evenings up until Christmas get taken over by Mr Cowell's music production vehicle. Every year, it happens. Never mind. I do have a cuppa and piece of cake. Well I think I've deserved it. And it's a low fat cake. Still quite heavy on the sugar so the calories are still there - can't have everything. In it's original guise it was a spiced apple sauce cake, but on finding, yet again, a fruit bowl full of pears that have gone over, I came up with this version. Hope you like.

Pear and Ginger Cake
1kg pears
50ml sunflower oil
100g plain flour
100g wholemeal flour
1 tbsp cornflour
2 tsp bicarbonate of soda
2 tsp ground ginger
1/2 tsp cinnamon
225g caster sugar
100g raisins

  1. Peel, core and slice the pears and put in a saucepan with 2 tbsp water. Cover and cook until softened and any excess moisture has cooked off.
  2. Pre heat the over to 160 c. Grease and line a 20cm spring form tin. Sift the flours, bicarb and spices into a mixing bowl, then stir in the sugar and raisins. Weigh out 550g of pear puree and stir into the dry ingredients along with the oil.
  3. Spoon into the tin, level the top and bake for 55-60 mins, until a skewer pushed into the centre comes out clean.
I was making again yesterday evening. I wanted a little coin purse to match my red manga bag and found this cute pattern in Issue 4 of Mollie Makes. Its a fiddly little thing to make, but I'm well chuffed with the end results.
I've still got just under half of my half metre left, so what next? Matching phone case? iPod cover? Camera case? Choices, choices....
xx

Thursday, 25 August 2011

Keeping Things Cosy.

Two very simple makes, both fat quart friendly. I've just knocked both of them up in just over an hour and that included making a mistake and having to unpick something! Don't you just love it when that happens?
Tea Cosy
Cafetiere Cosy
Tea Cosy
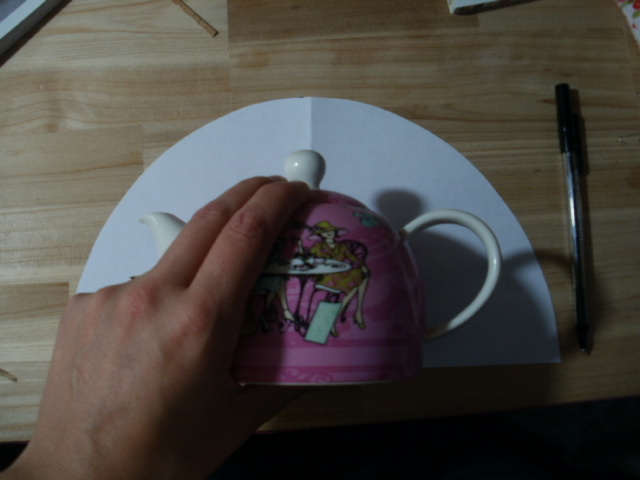
  1. Hold your teapot over a piece of paper and draw a semi circle around it. add a couple of centimetres for seam allowance.
  2. Cut two pieces from your main fabric, two pieces of interlining if required and two pieces of lining material.
  3. Sew main pieces right sides together round curved edge and repeat with the lining pieces.
  4. Turn main piece right side out and iron.
  5. Cut two pieces of wadding the same size as the outside piece.
  6. Push the lining piece inside the main piece so the wrong sides are facing. On each side, slip a piece of wadding in between the main body and the lining.
  7. Iron a piece of bias binding in half, then pin around the bottom edge. Then just sew a running stitch around the binding and you're done!
Cafetiere Cosy
  1. Measure around your cafetiere from one side of the handle to the other, then the height. add two centimetres to each measurement for seam allowance. cut two pieces of fabric and one piece of wadding.
  2. Sew on two pieces of ribbon each side. Mine were a couple of centimetres down from the top and up from the bottom, but you'll need to check where your handle is.
  3. Place your two pieces of fabric right sides together making sure that the ribbons are gathered together in the middle. The first time I made one of these I managed to catch the ribbon several times when I sewed it together. 
  4. Place the wadding underneath and pin all three layers together.
  5. Find the top centre point  and draw a small downward curve. This is where the spout is. (See pick below- having a frustration moment with this program!)
  6. Sew all around the edge leaving a gap at the bottom for turning out.
  7. Trim the corners and snip indents into the curve.
  8. Turn right side out, slip stitch the gap closed and iron. That's it! 
 
All we need now is a piece of cake to go with these hot cosy beverages. My next post will be my low fat, yes low fat (guilt free) pear and ginger cake. Mmm...